Today I have a blog post about how to get the desired look of the Queen of Hearts from Alice and Wonderland. I took inspiration from the Tim Burton version because the cartoon film has no real makeup looks I could look at. This one is a bold blue eye and a thin red lip. I really liked playing around with this look so I hope you enjoy it! Any comments about what tutorial you would like next is appreciated! Let's get into it!
Firstly, lets look at the look you will be left with at the end.
Firstly for the face, I just did a normal base. I used my Collection Primed and Ready Soothing Makeup Primer and then put my Revlon Nearly Naked Foundation in the shade 130 Shell. If you have a darker skin tone than mine, then try to use a lighter foundation, but if it's too noticeable then don't bother. I also put on my Collection Lasting Perfection Concealer on any blemishes and my under eyes. I then set my makeup with the Constance Caroll Translucent Powder, (I couldn't find this online!).
 |
| Top: L- Primer, R- Foundation Bottom: L- Concealer, R- Powder |
The bronzer and blusher I used was the Nars Orgasm and Laguna Duo. apply a lot of blusher and then a small amount of bronzer on the tops of the cheek bones. This gives a sunken in look. Then using the MUA Eyeshadow in Shade 12, I contoured the hollows of my cheeks, only slightly, as it is a grey sparkly colour.
 |
| Contour with the eyeshadow. |
 |
| Left: Nars Duo Right: MUA Eyeshadow- 12 |
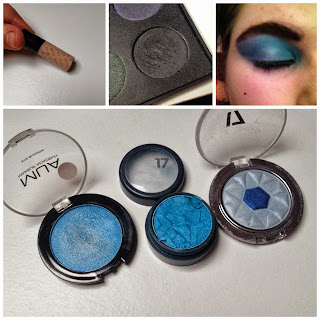
Then I applied Benefit Stay Don't Stray eye primer. Apply this under your eyes as well as your eyelids. After this I did my eyebrows and I used the black shimmery shadow called Shade 15 from MUA. You can use a matte shadow if you prefer, but I thought the shimmer would be nice for a Halloween look! And I set those with the MUA Clear Mascara. I then went onto eyeshadow. The first eyeshadow is the lighter of the two blue colours in the 17 Eyeshadow Duo. I applied this all over the lid up to the brow bone. This shade is a frosty blue which looks great in the inner corner when we are done blending. Then I put the colour Number 31 From MUA, all over the lid as a blue base. Then, in the crease, add a bright blue colour. I used 17 Single Eyeshadow in Socialite. Then, on the very edge of the eyebrow and the outer side/corner of the eye, I placed the darkest colour in the 17 Eyeshadow Duo. I hope that was clear!
 |
| Top: L-R: Eye Primer, Eyebrow Colour, Eye Look Bottom: MUA Shadow, !7 Eyeshadow - Socialite, 17 Eyeshadow Duo |
I put some lip balm on before the next step and then applied concealer to my lips and blended it out. This hides the lips. Then with a small brush, draw on a small pair of lips in red lipstick, (I used the Matte Red Lipstick from W7 in Vampire Kiss), in the shape of a heart. Then line around that with the black gel eyeliner I used earlier, this makes it stand out more. That's it! Then just add a small, black, beauty mark on the top of your cheek.
 |
| L-R: Hydrate Baby Lips, Lipstick and Brush, Lip Look |
That's it for today! I hope you enjoyed this look and that some of you use it this year for Halloween. I will at least do one more tutorial this year. I hope it was clear enough to follow too!
Thanks for reading,
Olivia xx


No comments:
Post a Comment